WORKOUTS

Fit to Run: Run for the Hills

Welcome to the latest edition of Workout Wednesday, when each week I share a new running or strength training workout. This week we are doing hills! Every runner's favorite workout is a hill workout, right? (Crickets). OK, so maybe they are not the favorite, but I assure you hill repeats are some of the most effective interval workouts for runners looking to improve running strength and increase speed. What's not to love about that?

I put together this hill workout that you can try on a treadmill. It is only 19 minutes long, but you'll get in a great workout during a short period of time. 

THE WORKOUT

Always warm-up before beginning any workout. 

Start by running for two minutes at 0% incline
Increase the incline to 2% and run for one minute at a hard effort (RPE 7-8)
Recover by jogging at an easy pace for one minute at 0% incline
Increase the incline to 4% and run for one minute at a hard effort
Recover by jogging at an easy pace for one minute at 0% incline
Increase the incline to 6% and run for one minute at a hard effort
Recover by jogging at an easy pace for one minute at 0% incline
Increase the incline to 8% and run for one minute at a hard effort
Recover by jogging at an easy pace for one minute at 0% incline
Decrease the incline back down to 8%, 6%, 4%, 2% with one-minute easy jog recovery between reps at 0% incline.
Cool down for two to five minutes

WORD TO THE WISE

This is a short but challenging workout. Allow your body adequate time after this workout to properly recover. Most athletes will need two to five rest and/or recovery days between hard workouts. You can do easy runs or lower impact activities during this time. Adaptation (getting faster and stronger) happens during rest, not during the actual workout. Be sure to allow your body the proper time for recovery from intense workouts in order to reap the benefits of your hard work. 

Never blindly follow a workout on the internet. Listen to your body. If you need more recovery time between reps, then take two minutes (or three). If an 8% incline is too hard, then only go to 6% or 4% and work to increase it in the future as you get stronger and fitter. If one-minute intervals are too much, start at 30 seconds. Always work according to your own fitness ability. Pushing beyond your limits will only lead to frustration, burnout, and injury. Start small when necessary and allow yourself the space to grow. Need help? Have questions? I'd love to help. 

Interested in hill workouts that you can try outdoors? I wrote a post last year about running hills that you may find helpful.


Like this post? It helps me when you share with your friends and followers. 

FIT TO RUN: MONTH ONE WORKOUTS, PUTTING IT ALL TOGETHER

Hi, friends! Welcome to the latest edition of workout Wednesday! If you've been following along, each week I have been unveiling my strength for runners program, a little bit at a time. 

Introduction
Goal Setting
Nutrition 101 for athletes (yes, that means you)
Rest and recovery
Fit to Run: Easy Run + Strength Training A
Fit to Run: Interval Run
Fit to Run: Easy Run + Strength Training B

MONTH ONE

The first month is an introduction to the program. If you have been running regularly but just beginning to incorporate strength training into your program, this is the perfect place to start. 

There are two rest days each week, four easy runs (30 minutes or less) + four 20 minute strength sessions and one interval run. You can learn more about each component of the program by clicking on the links above or downloading the PDF calendar and printable workouts below. The words on the PDF calendar have clickable links (once you download) that will also take you to the blog post that describes the workouts in more details. 

If you already subscribed to the blog then entering your email below will not cause you to receive duplicate emails. If you would rather just email me and I can send you the PDF, you can send the request to leagenders(at)gmail(dot)com. 

Stay tuned for month two of the program. We will progress to a different format of strength training, will start incorporating weights as we get stronger and introduce some new running workouts. If you have tried the month one workouts and would like to provide some feedback, I'd love to hear it. 

If you like this post, it helps me a lot when you share it with your friends and followers.


Stay strong runners!


Fit to Run: Easy Run + Strength Day B

Welcome to the latest edition of #workoutwednesday! If you've been following along, you know I've been putting together a strength training program that can be incorporated into any running program. Most runners know they should be strength training to get stronger, faster and become less prone to injury, they are just not sure how to fit it all in. I'm here to help.

I am excited to share my strength training for runners program with you as it unfolds. Each week I will share a new component of the program. We are starting with phase one which will last four weeks. I wrote an introduction to the program that explains how I am putting it all together. The intention is to slow-drip the content to my blog readers as it is created and then eventually offer it as an ebook once it's complete. 

If you subscribe to my blog you won't miss any of it as it is released. Enter your name and email to download a printable version of this workout. If you are already subscribed, you won't receive duplicate emails if you enter your email again to get the download.

This post contains affiliate links. That means if you click on a link in this post and make a purchase, I make a small percentage of the sale at no additional cost to you. No one is getting rich here, it just helps with the running (pun intended) of this blog. Thanks, as always, for your support. 

STRENGTH AND RUNNING

If you are following along, Day one is an easy run + strength training A, Day 2 is an interval run that can found here. Week one day three is another easy run at conversational pace plus strength training B

FIT TO RUN

EASY RUN

The easy run should be 30 minutes or less at at a low intensity at conversational pace. This means the effort level is leisurely and you can hold a conversation without gasping for breath between sentences. You can learn more about Rate of Perceived Exertion or RPE and how to determine your effort level in this post. The purpose of this workout is to build and maintain and running base. 

It is also a short run so that you can fit both your run and your strength training workout in under an hour. It is not my intention to have you working out for 2 hours a day. Let's get it done quickly and efficiently so you can get back to that thing called your life. We will advance into some longer runs and higher intensity workouts in the next month.

STRENGTH DAY B

The strength training workout is about 20 minutes including rest periods. We are starting out with bodyweight exercises that can be progressed by adding weights as you get stronger. 

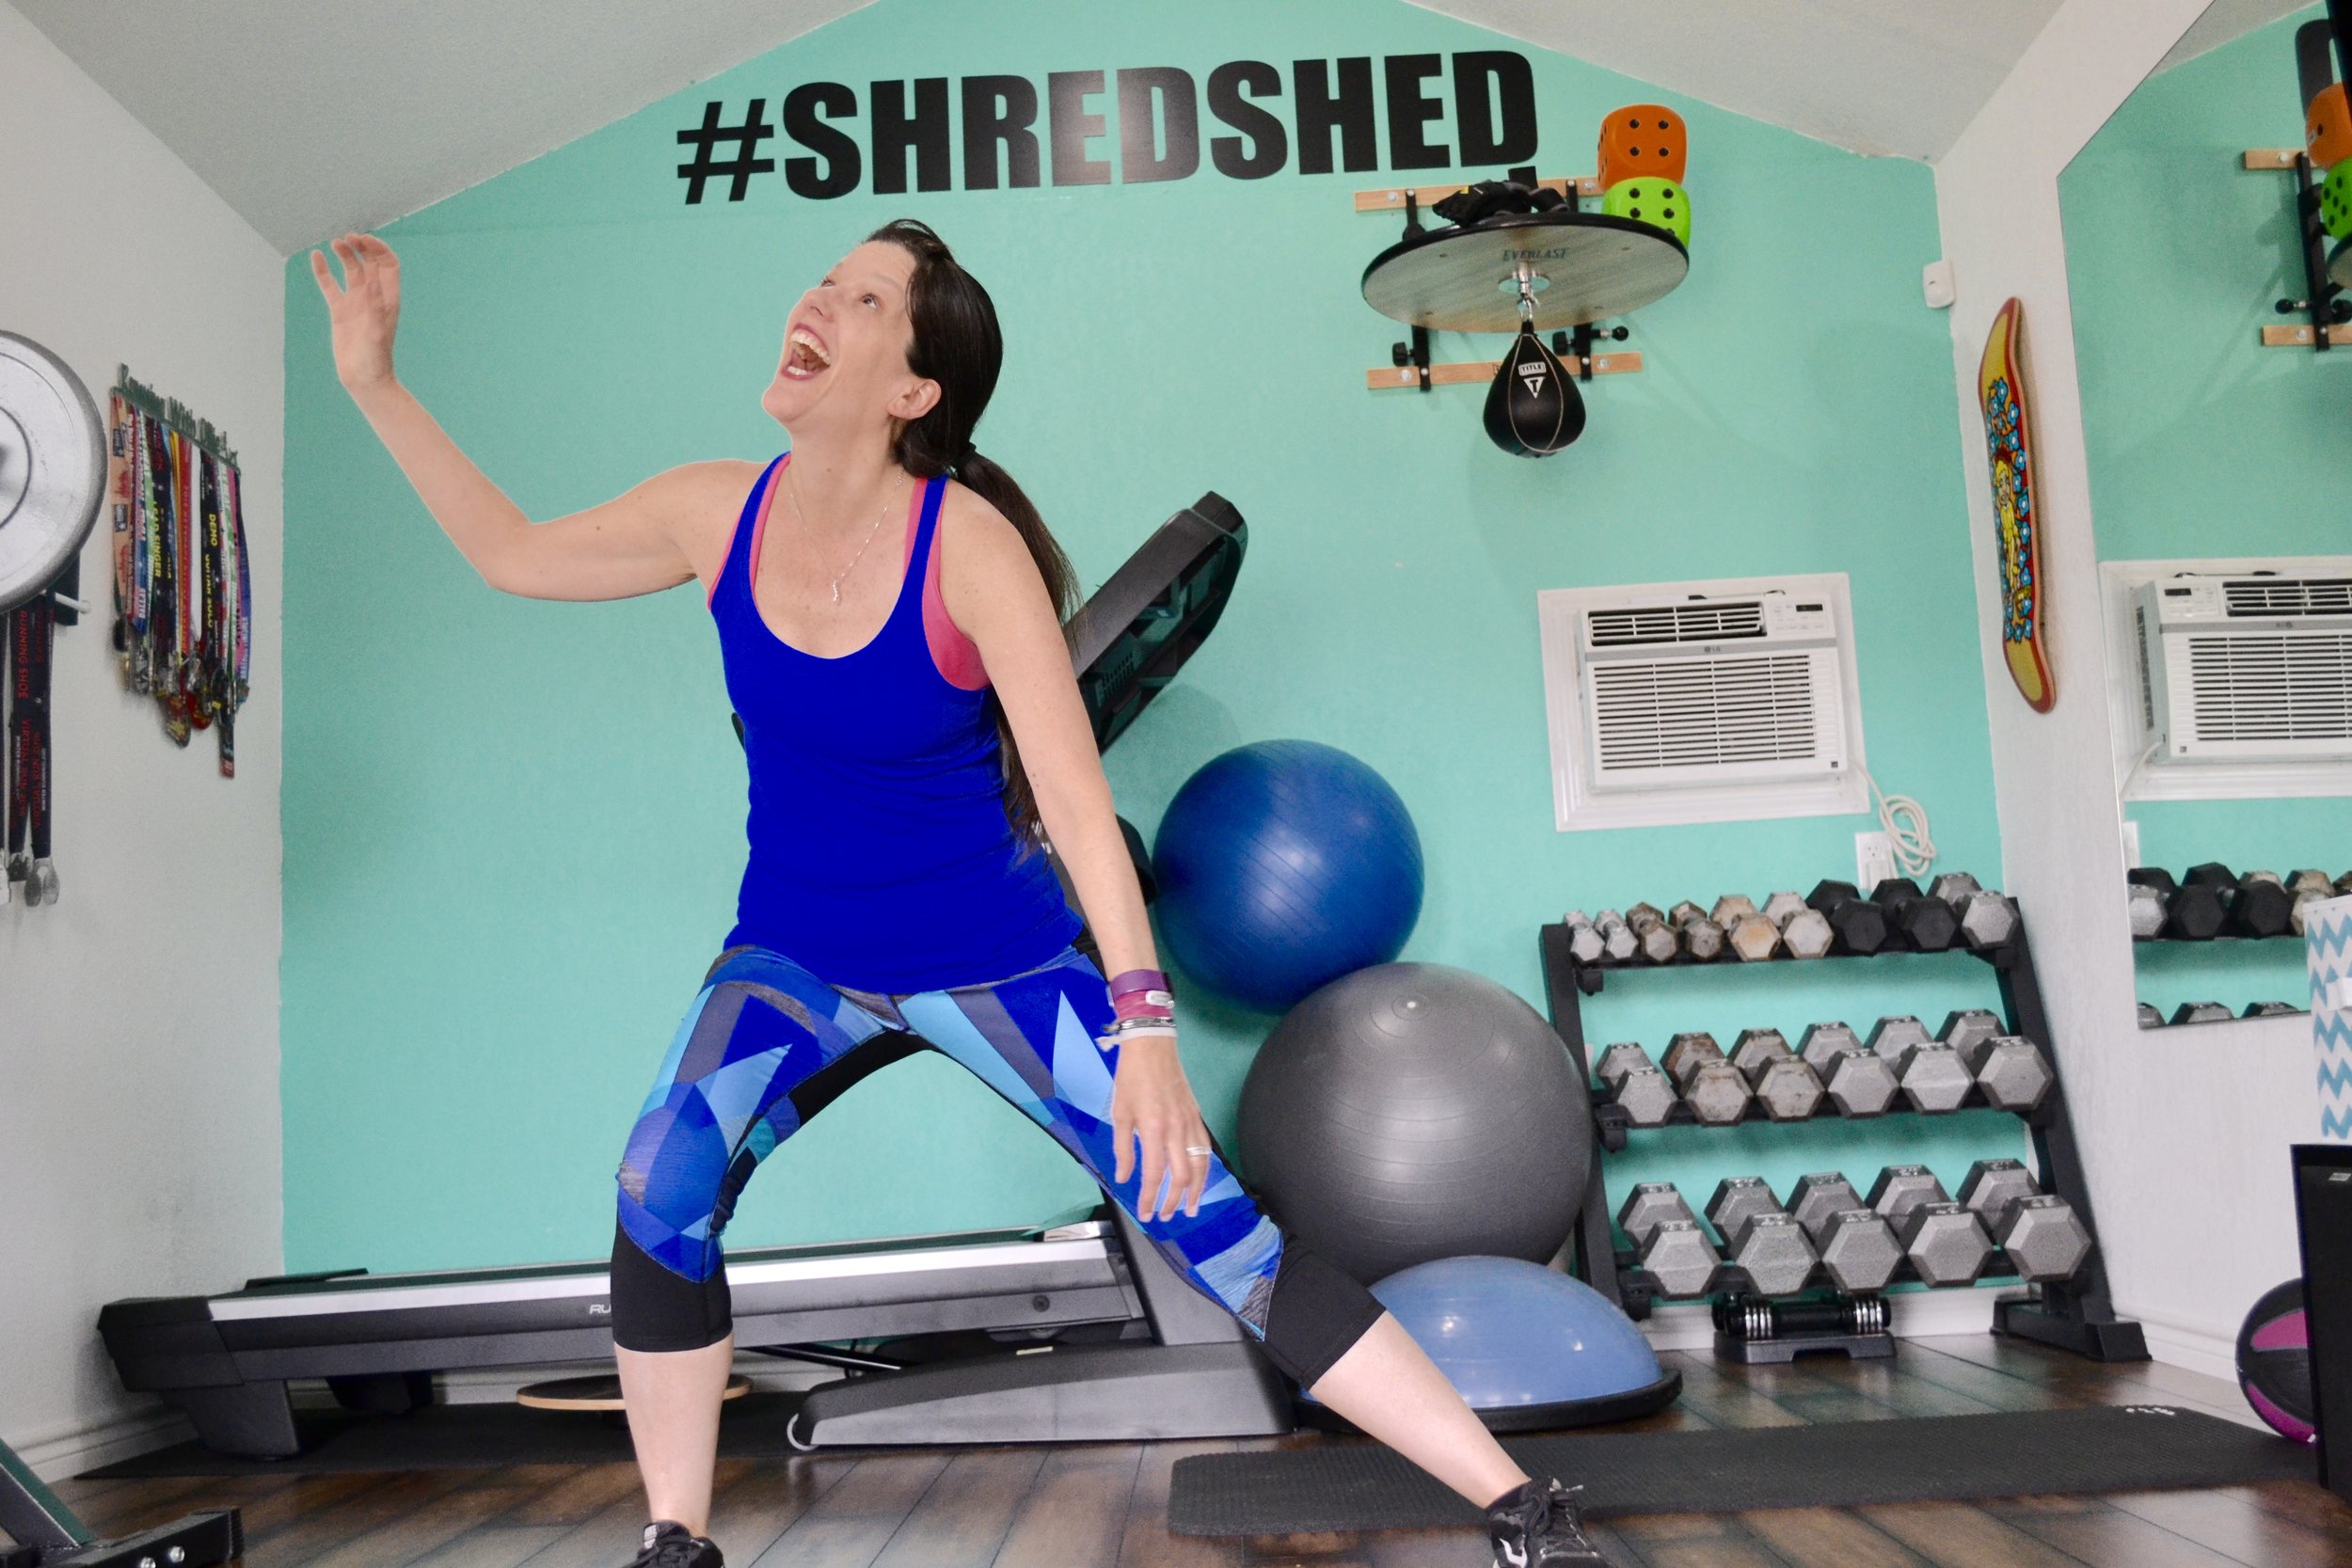
This workout uses a 20 second work/10 second rest protocol repeated for 4 minutes. You can search "Tabata timer" in the app store or on Google play to find a free timer. I use this wall mounted interval timer in the #shredshed and the  GymBoss timer at bootcamp or outdoors.

For each round you will alternate between two exercises for the four minute duration.

Exercise one: 20 seconds
rest 10 seconds
Exercise two: 20 seconds
rest 10 seconds
repeat for four minutes
rest one minute between rounds

These particular exercises were selected to strengthen your core (which includes your hips). Runners often have muscle imbalances because as you run, your quadriceps (front of your thigh) and your calves grow strong while your hips and hamstrings are under utilized. 

Be sure to warm up before beginning any exercises.

FIT TO RUN STRENGTH DAY 2.png

ROUND ONE

BIRD DOG

On all fours with your wrists directly underneath your shoulders lift one arm off the floor to shoulder height while lifting the opposite leg in line with the hip. Hold for 20 seconds, then rest for 10 seconds. Switch arms/legs on each round. Flex your abs and glutes during the move while breathing normally.

SUPERMAN

Lying face down on the floor with your arms extended in front of you, raise your arms, chest and thighs off of the floor and hold for 20 seconds, the rest for 10 seconds before moving on to the next exercise.

ROUND TWO

HIP RAISES

Lie on your side with your legs stacked on top of one another. Lift your top leg to about 45 degrees before lowering. Repeat for 20 seconds and rest for 10 seconds before moving on to the next exercise. Alternate sides on each round.

SIDE PLANK

Lift yourself up into an elbow side plank position with your shoulder directly over your elbow. Stack your feet and don't allow your hips to drop. Hold the position for 20 seconds before resting for 10 seconds before moving onto the next exercise. Alternate sides on each round. 

ROUND THREE

LOW PLANK

Position your elbows on the floor with your shoulders directly over your elbows. Your body should be in a straight line parallel to the floor. Engage your core while breathing normally. Squeeze your glutes. Be careful not to sink your hips or raise your butt in the air. Do not clasp hands in front as this throws off your alignment. Hold for 20 seconds, rest for 20 seconds before moving on to the next exercise.

LOW PLANK CRAWLER

Hold the same position as above. While in the low plank position, bring your knee out to side and bring as close to your elbow as your flexibility will allow. Be careful not to sink your hips low or raise your butt in the air. Alternate sides for 20 seconds, then rest 10 seconds before moving on the next exercise

(You will probably hate me after this round. If it is too challenging, you can make it a little easier by doing straight arm plank instead of low plank)

ROUND FOUR

RUSSIAN TWIST

Sit with your back at a 45 degree angle. Lift your heels off the ground to increase the challenge. Rotate your torso to touch both hands to the floor on one side, then alternate and touch both hands to floor on the other side. You can add a weight or medicine ball to increase the challenge. Alternate sides for 20 seconds, rest for 10 seconds before moving on to the next exercise. 

TRICEP DIP

Position your hands shoulder width apart behind you on a bench or chair.  Slide your bum off the front of the bench with your legs extended out in front of you. Bend your elbows to lower your body toward the floor until your elbows are at about a 90-degree angle while keeping your back close to the bench. From the low position, straighten your elbows to return to the starting position. Keep your shoulders down as you lower and raise your body. Repeat for 20 seconds then rest for 10 seconds before moving on the next exercise. (Yes! Runners need strong arms too.)


PUTTING IT ALL TOGETHER SO FAR

Introduction
Fit to Run: Easy Run + Strength Training A
Fit to Run: Interval Run
Fit to Run: Easy Run + Strength Training B (this post)

Hope you will stay tuned for future installments as we progress through the program. Coming up next are more running workouts, new strength workouts and more on nutrition for performance. 

Like this post? It helps me when you share. 


Coach Lea


Fit to Run: Easy Run + Strength Day #1

Hi, friends! I am excited to share my strength training for runners program with you as it unfolds. Each week on #workoutWednesday I will share a new component of the program. We are starting with phase one which will last four weeks. I wrote an introduction to the program last week that explains how I am putting it all together. The intention is to slow-drip the content to my blog readers as it is created and then eventually offer it as an ebook once it's complete. 

We already talked a little about goal setting, because it makes sense that before you start any new program you really think about what you want to get out of it. For best results think about your goals and what you what to accomplish over the duration of the program.

I am also including a nutrition component in the program because fueling your body properly for performance is important. You can check out this post about how to self-analyze your food journal as a starting point. More to come on sports and exercise nutrition. 


WEEK ONE DAY ONE

Day one is an easy run and the strength training "A" workout.

EASY RUN

An easy run should be 30 minutes or less at a conversational pace. This means the effort level is leisurely and you can hold a conversation without gasping for breath between sentences. You can learn more about Rate of Perceived Exertion or RPE and how to determine your effort level in this post. The purpose of this workout is to build and maintain and running base. 

STRENGTH TRAINING "A" WORKOUT

The strength training workout is about 20 minutes including rest periods. We are starting out with bodyweight exercises that can be progressed by adding weights as you get stronger. 

This workout uses a 20 second work/10 second rest protocol repeated for 4 minutes. You can search "Tabata timer" in the app store or on Google play to find a free timer or I like to use the (afffiliate link-->) GymBoss timer. 

For each round you will alternate between two exercises for the four minute duration.

Exercise one: 20 seconds
rest 10 seconds
Exercise two: 20 seconds
rest 10 seconds
repeat for four minutes
rest one minute between rounds

These particular exercises were selected to strengthen your core (which includes your hips). Runners often have muscle imbalances because as you run, your quads (front of your thigh) and your calves grow strong while your hips and hamstrings are under utilized. You run in only one plane of motion (forward). To improve strength, overall athleticism and avoid injuries, it is essential to build strength laterally. 

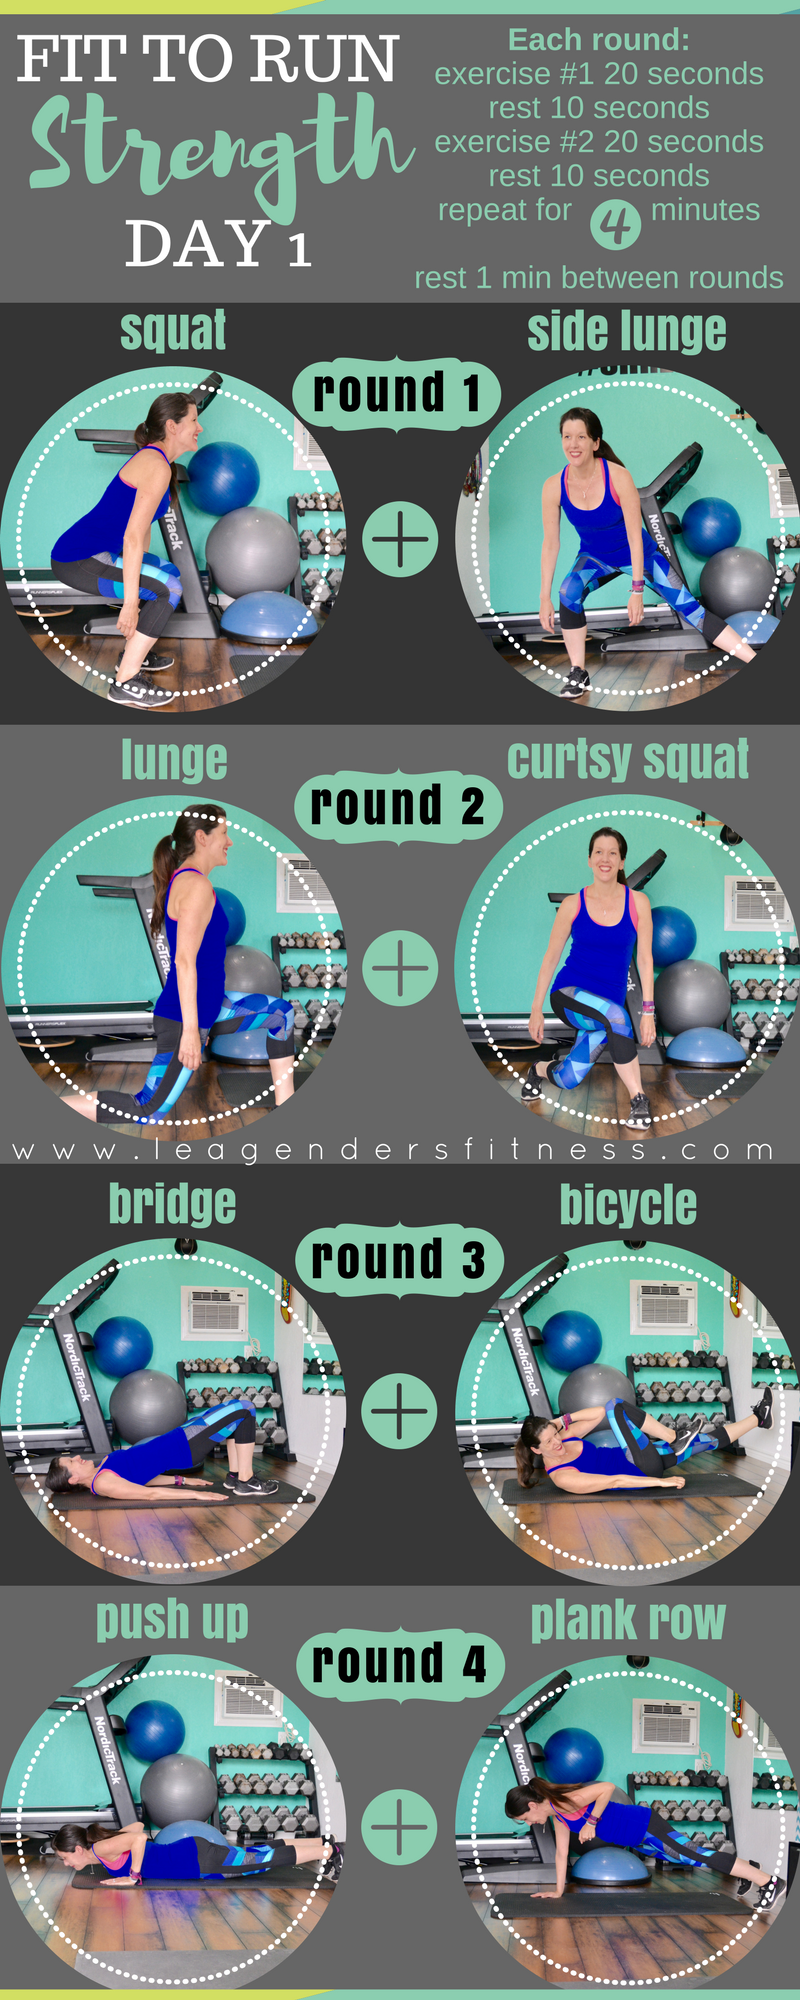
Fit to run strength training for runners - download a printable version of this workout. Save to your favorite fitness Pinterest board

Fit to run strength training for runners - download a printable version of this workout. Save to your favorite fitness Pinterest board

ROUND ONE: SQUAT AND SIDE LUNGE

SQUAT:

Push your hips back and lower until your thighs are parallel to the floor (like you are sitting back in a chair) or as low as your flexibility allows. In the low position, engage your core, squeeze your glutes and push back up to standing. Return to center, push hips back again and repeat for 20 seconds. Take a deep breath in as your lower to the squat and breathe out as you return to standing. Rest for 10 seconds before moving on to the next exercise.

SIDE LUNGE: 

Face forward with toes pointing straight ahead, take a wide step out to your right side. Push your hips back, bend your right knee, while straightening your left leg. With your back straight, hinge at your hips to aim to touch the floor with both hands on either side of your foot. Do not round your back or allow your knee to move forward beyond your toe. Be sure to keep your torso and both feet facing forward. Alternate between the right and left side for 20 seconds. Rest for 10 seconds before moving on to the next exercise.

Rest for up to one minute between rounds. 

ROUND TWO: LUNGE AND CURTSY SQUAT

LUNGE:

With your feet hip width apart and your toes pointed straight ahead, engage your core and keep your back straight. Take one large step with your right leg to lunge forward until your front knee is lined up over your ankle and your back knee is nearly touching the floor. Do not allow your knee to move forward over your toes. Resist the urge to lean forward or rest your arms on your thighs. Once you are in the lunge position push back up to starting position. Alternate legs for 20 seconds. Rest for 10 seconds before moving on to the next exercise

CURTSY LUNGE

Stand with your feet hip apart. Cross your right leg behind the body and to the left. Bend left knee 90 degrees, or as low your flexibility will allow, toes pointing forward, then return to starting position. Alternate sides for 20 seconds. Rest for 10 seconds before moving on to the next exercise.

Rest for up to one minute between rounds.

ROUND THREE: BRIDGE AND BICYCLE

BRIDGE:

Lie on your back with your knees bent and push your hips off the floor so your body is in a straight line from your shoulders to your ankles. Squeeze your glutes and engage your abs for 20 seconds. Rest for 10 seconds before moving on to the next exercise.

BICYCLE:

Lie flat on the floor with the lower back pressed into the ground. Place your hands on either side of your head, do not lock your fingers or pull on your head. Lift your head and shoulder off the floor and touch your right elbow to the left knee. At the same time, straighten your right leg, keeping it several inches off of the floor. Alternate sides to repeat the motion you'd make while pedaling a bicycle for 20 seconds. Rest for 10 seconds before moving on the next exercise. 

Rest for up to one minute between rounds

ROUND FOUR: PUSHUP AND PLANK ROW

PUSH UP:

Start in a high plank position with your hands placed a little wider than your shoulders. Keep your body in a straight line, while engaging your core, bend your elbows slowly to lower your chest to the floor. Once in the low position, push back up to the starting position. If this is too challenging, drop to your knees or do incline pushups to reduce the weight. Repeat for 20 seconds. Rest for 10 seconds before moving on to the next exercise.

PLANK ROW:

Start in a straight-arm high plank position with your wrists directly under your shoulders and your legs slightly wider than hip width for stability. Keep your body in a straight line from your shoulders to ankles while engaging your core. Do not allow your hips to hike up or sag down.

With your core tight and your glutes engaged lift your right elbow to row as you bend your elbow up toward the ceiling. Keep your elbows close to your side, do not allow them to flare out. You can do this exercise with or without weights. Alternate sides for 20 seconds. Rest for 10 seconds before moving on to the next exercise. 

When you're finished, if you're a weirdo like me, you'll sing for joy. Or maybe not.

Like this post? It helps me when you share with your friends or followers.


Coach Lea


Rate of Perceived Exertion: How to Determine Running Pace and Effort + Interval Workout

I am working on a new strength training and running program. It will include running workouts as well as short runner-specific strength workouts that can be completed after your runs on easy effort days. I am writing the program for a wide audience (hopefully, cross your fingers and toes) so I have to be more general than I would be with my own clients. Since I don't know your running background, experience or injury background, I can't give you specifics on what paces or distances you should run.

For example, if I assign a 10 minute mile pace for three miles as an "easy" day run, this may not be so easy for a brand new runner. On the other hand, if I assign a 9 minute mile pace for five miles as a tempo run, it may not be challenging enough to achieve tempo for a more experienced runner. 

On my programs, I define runs as "easy runs" and "interval runs" and I leave it up to you to decide what those paces mean to you. If you try to hit someone else's arbitrary paces before your fitness level dictates it, you'll only end up frustrated and possibly injured.

We solve this issue by using the RPE (rate of perceived exertion) chart. It is very easy to follow. You base your pace on your perceived level of effort. By determining your own paces based on your current fitness level you will be able to grow with the program as you get faster and stronger. 

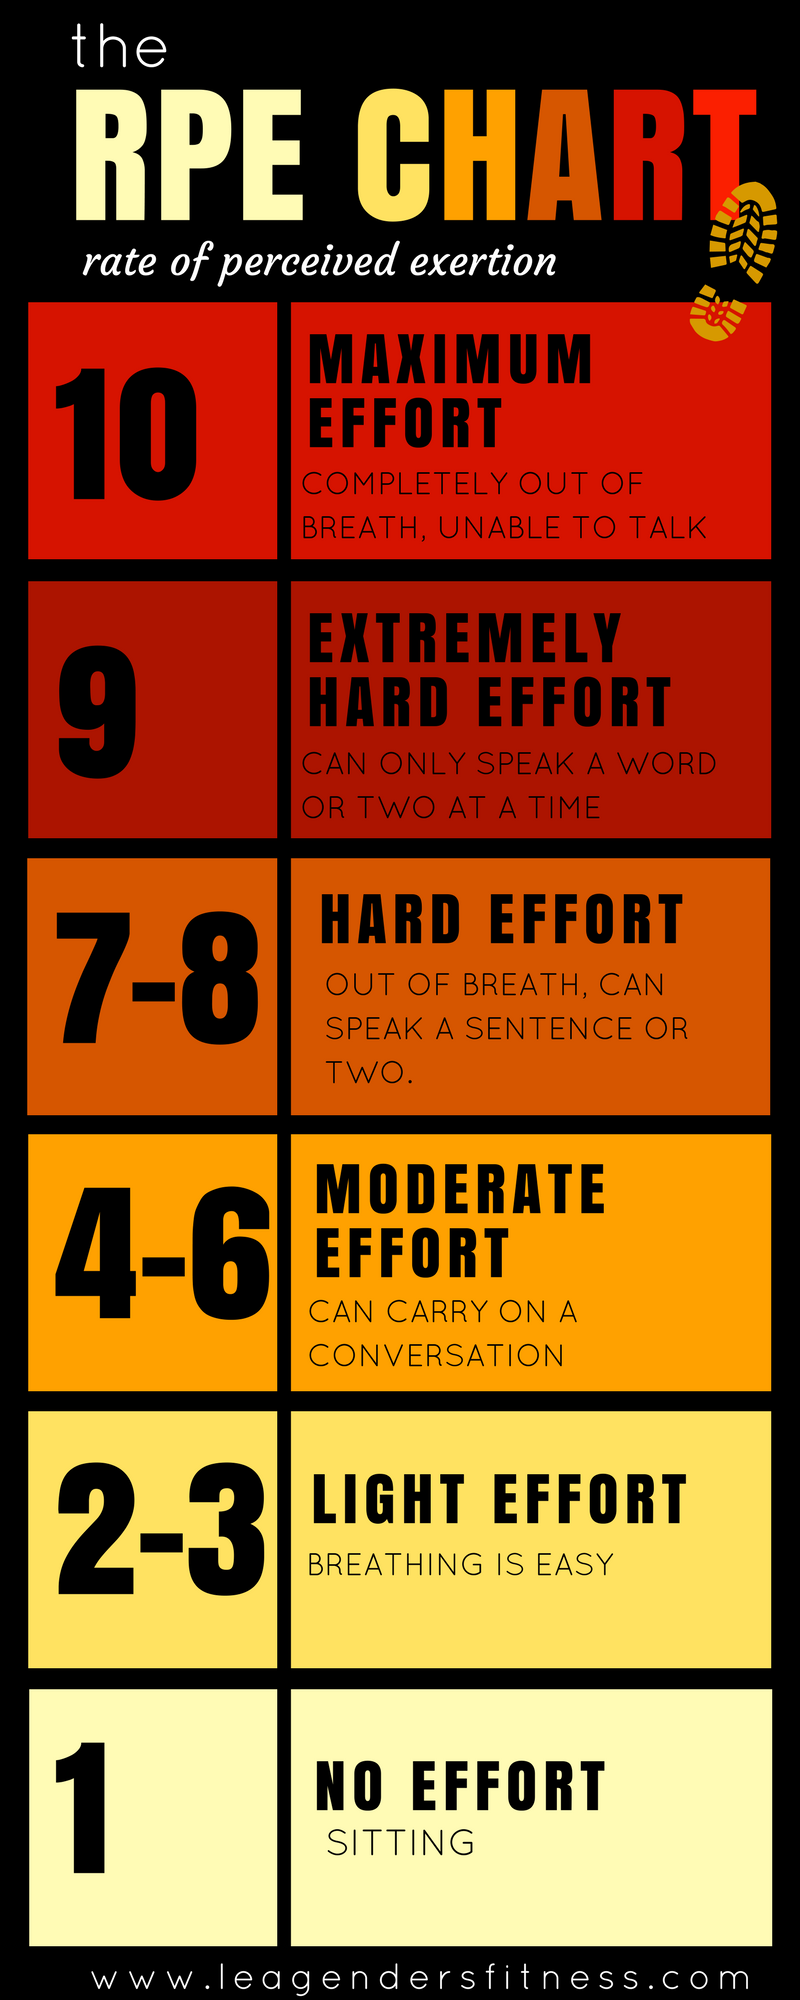
THE TALK TEST | RPE CHART

Your RPE can be determined by the talk test.

RPE:1 No effort. You are probably sitting.

RPE:2-3 Light effort. Breathing is extremely easy. You may be walking at a leisurely pace.

RPE: 4-6 Moderate effort. You are working a little harder, maybe a jog, but you can carry on a full conversation at this pace without gasping for air between words or sentences. 

RPE: 7-8 Hard effort. You can speak a sentence or two at a time before having to taking a gasp of breath.

RPE: 9 Extremely hard effort. You can get out a word or two but breathing is labored and talking is challenging.

RPE: 10 Maximum effort. You are completely out of breath and unable to talk. You would only be able to hold this pace for a very short time.

EASY RUN

When your plan has an easy run day, this would be a RPE level 2-6. You should always be able to talk through full sentences and conversations when at this pace. It is sometimes referred to as 'conversational pace.' For some this may be walking briskly, for others a jog. 

To get the most out of your training it is important to go easy on easy days and hard on hard days.

INTERVAL PACE

An interval is when you run at varying paces throughout the workout. It is an effective and time-saving way to get the most out of your run. In an interval run, I may ask you run one minute at a RPE of 7-8 followed by one minute at a recovery pace. Your speed for one speed minute interval should feel hard, but not an all out effort. It may take some experimenting to find out what that pace is for you.

RECOVERY PACE

The recovery period during the interval workout will be a RPE 2-3. After a period of a hard effort, you will return to a much easier pace in order to recover before repeating the interval. 

TRACKING YOUR PROGRESS

If you have the means to do it with a GPS watch or a treadmill, I recommend tracking your current paces at each RPE level. You may find when you start, as an example, that a RPE 2-3 is a 15 minute mile, a RPE 4-6 is a 10 minute mile and a RPE 7-8 is 9 minute mile. Then over time, as you get faster and more efficient, your paces will go down for each level. You may find after regular training that now your RPE for 2-3 is a 12 minute mile, RPE 4-6 is a 9:30 minute mile and RPE 7-8 is an 8:30. It's a great way to track improvements. Make sense? Have questions? I'm happy to help. 

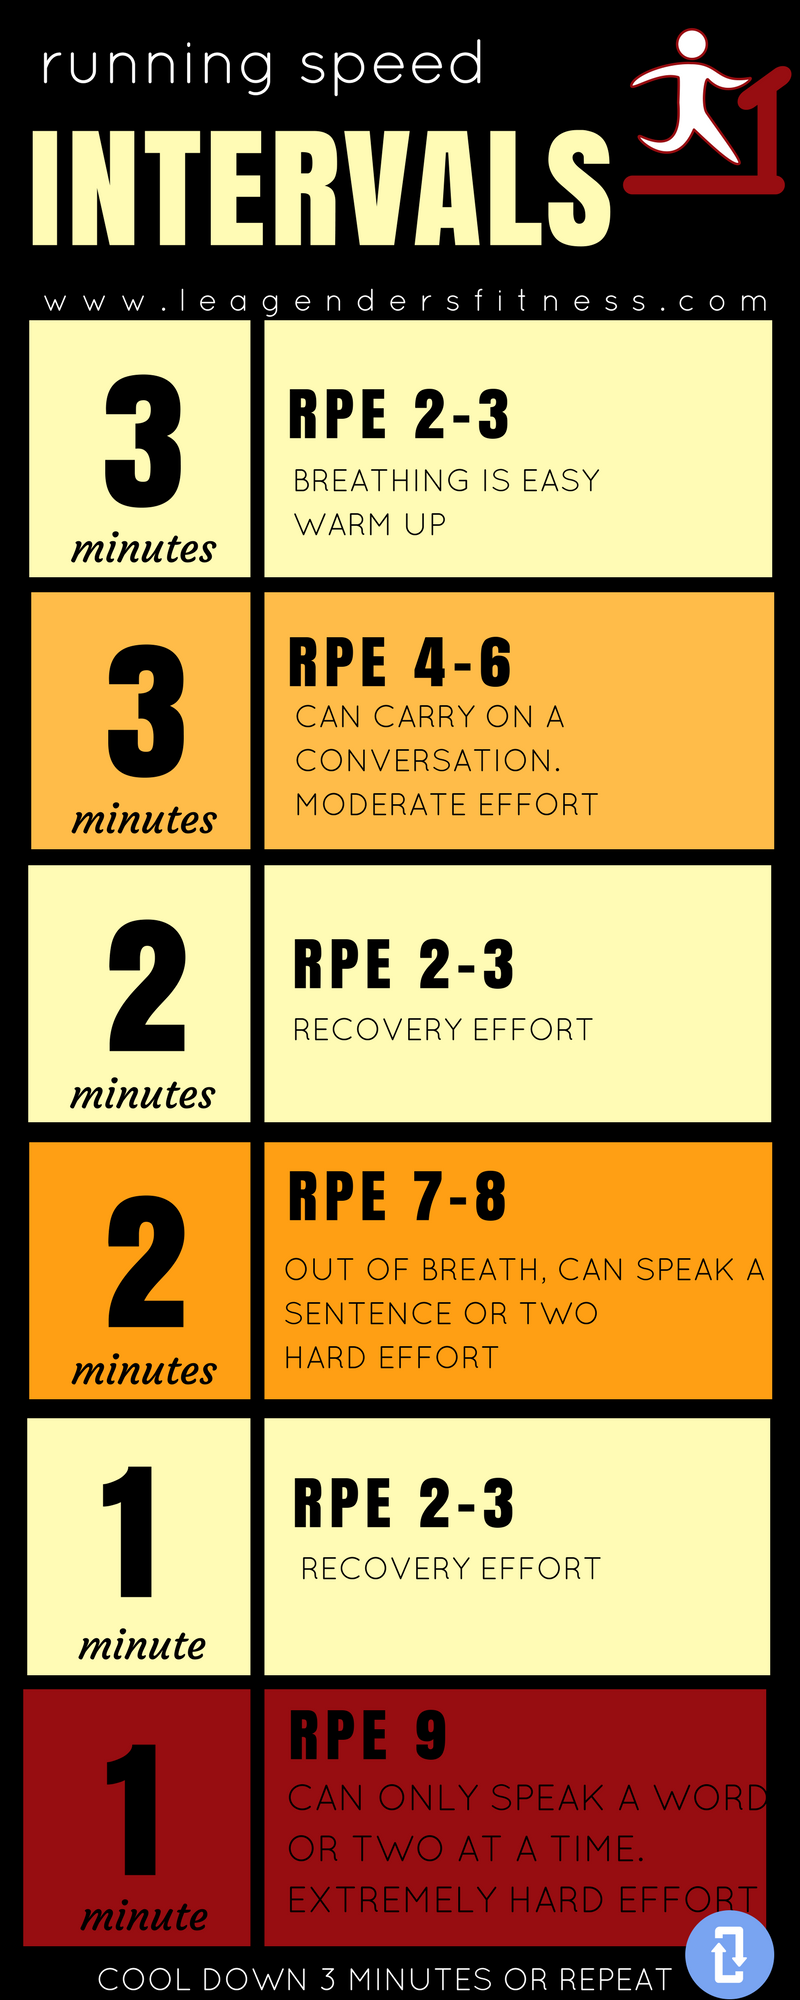
RUNNING SPEED INTERVAL WORKOUT

Here is a workout that you can try to get a feel for the different paces. This is a very short and efficient workout. I recommend warming up with dynamic stretches before the run, then begin with the 3 minute RPE 2-3 pace as shown below.

You'll notice that as we start with a 3 minute interval at a moderate pace then a 2 minute interval at a harder pace and finish with one minute at an extremely hard pace. See what feels right for you at each of these work intervals.

The pace you choose for the 3 minute interval will feel harder than a walk, but not so hard that you can't maintain it for three minutes.

The 2 minute interval will be a little harder than your 3 minute interval, but still not so hard that you can't maintain the pace for two minutes

The final 1 minute interval will be just under an all-out effort. Good thing you only have to hold that pace for one minute.

Either cool down with a three minute recover walk (beginners) or repeat the workout (advanced).

Like this post? It helps me when you share with your friends and followers.

Coach Lea