WORKOUTS

The 30-20-10 Interval Running Workout

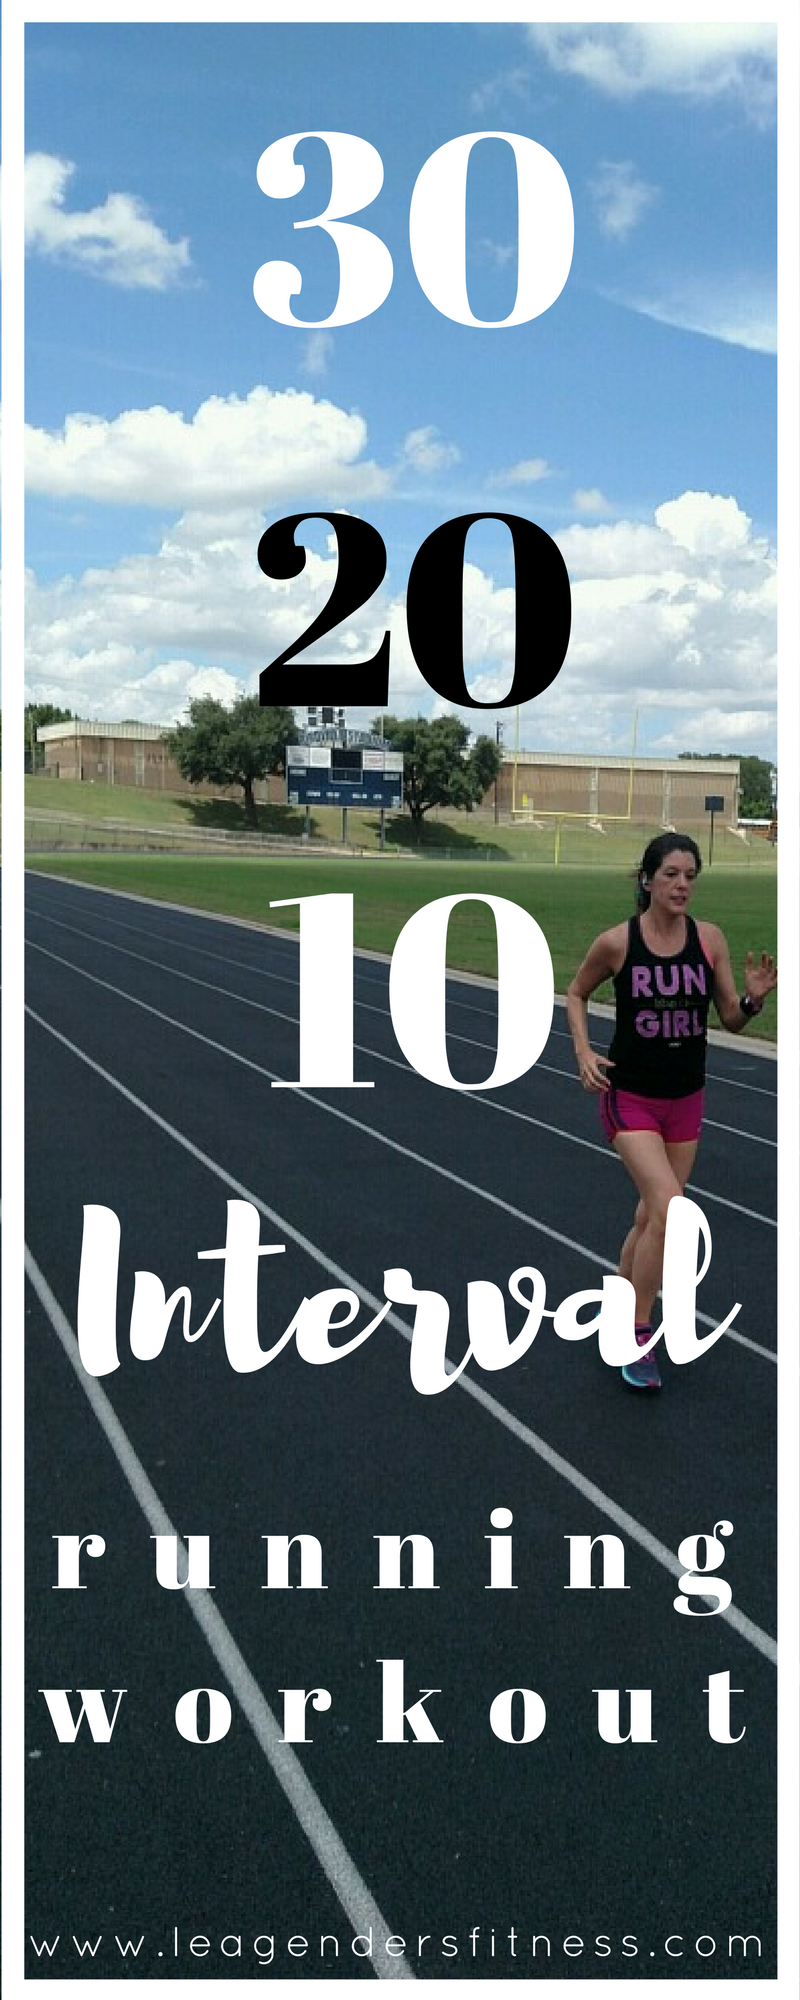
Welcome to the latest edition of workout Wednesday! This week I have a great interval running workout for you to try. This workout was developed by Dr. Jens Bangsbo at the University of Copenhagen in Denmark to increase speed in recreational runners. If you are looking for an easy way to incorporate interval or speed training into your running workouts this is a great place to start. You could do it on the street or the track with a timer (affiliate --> I use a gymboss interval timer) or on the treadmill.

This is a by-feel paced workout. That means you don't need a GPS watch to make sure you hit certain paces. All you need is a timer and a pair of running shoes (OK, clothes would probably be a good idea too). 

Warm up by walking or jogging 10 minutes or one mile.

30 seconds

Start at a slow pace for 30 seconds. This should feel very easy, breathing is easy. For a beginner this may even be a brisk walk. It's called conversation pace. You could hold a conversation while maintaining this pace. 

20 seconds

Accelerate to a moderate pace for 20 seconds. This should be your race pace. A little faster than your easy pace but not an all-out-sprint. It should feel comfortably hard. You could probably get out a sentence or a few words between breaths, but you are working too hard to hold a conversation.

10 seconds

Then sprint as hard as you can for 10 seconds. Go for it. Give it all you have for 10 seconds. You can't talk at all while holding this pace. 

Repeat four more times in a row without rest for a total of 5 minutes of these intervals.

2 Minutes

Rest until your breath is fully recovered (about 2 minutes).

Repeat

Repeat these 30-20-10 sessions and rest periods until fatigued (no more than 30 minutes) for a quick and effective speed workout for runners of all levels

Cool down by jogging or walking 10 minutes or one mile.

Doesn't Ollie demonstrate the 10 second sprint pace picture perfectly? Good dog. 

Doesn't Ollie demonstrate the 10 second sprint pace picture perfectly? Good dog. 

Add this workout to your schedule 1-2 times per week with rest days and easy-paced run days in between hard workouts.

A general rule for intense training: A little is better than none and a lot is too much. Remember that our bodies adapt (grow stronger and faster) during rest, not during the workout. Allow your body adequate time to recover between hard workouts for the best results.

Like this post? It helps me when you share. 

MINI BAND EXERCISES FOR RUNNERS

Welcome to the latest edition of Workout Wednesday! When I talk to runners about strength training we often talk about minimum required dose. Runners aren't usually thrilled of the idea of spending hours in the gym each week. They run because they love to run. They strength train (or they probably should) because they want to be a stronger, faster runner while reducing the chances of injury.

Minimum required dose is the least amount we can do to get results. The truth is you don't need to spend hours and hours in the gym each week. You can spend 10-15 minutes at the end of each run, or 30 minutes three times a week or an hour twice a week. It depends on your goals, your lifestyle, your preferences and your abilities.

My friend took these pictures for me in the #ShredShed and she sent me this GIF. 

My friend took these pictures for me in the #ShredShed and she sent me this GIF. 

If you want to be a great runner it makes sense to spend a lot of time running. However, investing the time in strength training often yields big results for runners. It is OK to start small and build over time. A little strength training is always better than none. Our goal should be to become well-rounded athletes. 

This post contains affiliate links. That means if you click on a link in the post and make a purchase I make a small percentage of the sale with no additional cost to you. No one is getting rich here, it just helps with the running (pun intended) of this blog. 

This is why I love mini bands. They are very inexpensive, portable and the exercises can be done anywhere at anytime (well, maybe not in the halls at work or school). You don't need to invest a lot of money into strength training equipment, these little bands provide plenty of resistance. You could even put one in your running belt so you can squeeze in some exercises after your outdoor run. 


This weekend I hit the #Shredshed to show you some exercises you can do to incorporate glute/hip strength training into your running routine. Weak hips are often the missing link for runners and can be the source of all kinds of problems and injuries. A little pre-hab can go a long way in injury prevention. 

If you are brand new to this or if you don't have mini bands, you can do these exercises without the bands to start and then add bands in a few weeks in order to continue to progress. Our bodies adapt to the exercises that we do, so every three to four weeks look for ways to make the exercise harder, either by adding more resistance, more reps, more sets, more days, etc. 

I recommend starting by incorporating these exercises at the end of an easy run day two times per week. Start with 2 sets of 10 reps of each exercise. I like to do them in circuit fashion, moving from one exercise to the next with little break, then repeating the circuit one more time.

You can buy mini bands here on Amazon.

Coach's Tip

Be careful not to let your knees collapse inward when performing any of these exercises. Work to keep your knees out and inline with your toes. 

what NOT to do.

what NOT to do.

Good luck! Give it a try after your next easy run and let me know if you feel the burn! 

Like this post? It helps me a lot when you share or save to Pinterest.

Rock 'n' Reps Pyramid Workout

Are you ready to Rock 'n' Rep? Welcome to the latest edition of Workout Wednesday! This week I have a quick workout for you to try after your next easy run. It's the Rock 'n' Reps Pyramid workout. The rock part is an isometric hold. This means you hold the position for the time indicated. You can you use a timer or just count one-mississippi, two-mississippi, etc. Then perform the assigned amounts of reps for each exercise. 

SQUAT PYRAMID

5 second isometric squat hold, 5 reps
10 second isometric squat hold, 10 reps
15 second isometric squat hold, 15 reps
10 second isometric squat hold, 10 reps
5 second isometric squat hold, 5 reps

PLANK AND PUSH-UP PYRAMID

5 second isometric plank, 5 push-ups
10 seconds isometric plank, 10 push-ups
15 second isometric plank, 15 push-ups
10 seconds isometric plank, 10 push-ups
5 seconds isometric plank, 5 push-ups

BRIDGE PYRAMID

5 second isometric bridge hold, 5 reps
10 second isometric bridge hold, 10 reps
15 second isometric bridge hold, 15 reps
10 second isometric bridge hold, 10 reps
5 second isometric bridge hold, 5 reps

This is also a fun one to try if you have a partner. One partner would perform the reps while the other partner holds and then switch roles before you work up and down the pyramid time/reps.

Like this post? It helps me when you share or save on Pinterest

Beginner Kettlebell Circuit Workout for Runners

Welcome to the latest edition of Workout Wednesday! This week we are talking kettlebells! One of the reasons that I love kettlebells is that they are great for incorporating a cardio and strength workout in one. The kettlebell swing is a great exercise to get your heart pumping, and for that reason the swing is the cornerstone move in this kettlebell circuit workout for runners. 

I call it a beginner kettlebell workout because it is great for someone who is new to kettlebells to get a feel for the tool without too many complicated moves. There is nothing overly technical here (see notes below to ensure you are performing the swing correctly) and most of these exercises can be done with just a dumbbell too. 

This post contains affiliate links which means if you click on a link in this post and make a purchase, I make a small percentage of the sales with no additional cost to you. No one is getting rich here, it just helps with the running (pun intended) of this blog. 

I am using a 20lb kettlebell. Choose a weight according to your own fitness level.
I like the GymBoss timer to time my intervals, but you could also just use your phone as a timer.

THE KETTLEBELL CIRCUIT FOR RUNNERS

Start this circuit with 30 seconds of kettlebell swings, then do 30 seconds of each move with kettlebell swings between each strength move. 

Kettlebell swings 30 seconds
Squat & Press 30 seconds
Kettlebell swings 30 seconds
Lateral lunge right 30 seconds
Lateral lunge left 30 seconds
Kettlebell swings 30 seconds
Single leg deadlift right 30 seconds
Single leg deadlift left 30 seconds
Kettlebell swings 30 seconds
Plank row right 30 seconds
Plank row left 30 seconds
Rest 30 seconds

Perform circuit 3 times. 

Coaches Tips:

THE KETTLEBELL SWING

Start with your legs hip width apart with your knees slightly bent and the kettlebell between your legs, above your knees. Push your hips back behind your center of gravity. With your arms locked straight use your hips to thrust the kettlebell forward. Keep your core tight, your back straight and chest up. Do not lean back or extend your back at the top of the swing. The most important thing to remember is that this is hip hinge move, not a squat, there should never be more than a slight bend at the knees. 

SQUAT AND PRESS

With your feet a little wider than hip width apart, toes pointing forward, push your hips back and lower until your thighs are parallel to the ground (or as low as your flexibility allows) while shifting your weight onto your heels. Touch your elbows to your knees and press the kettlebell ball over your head into a shoulder press. 

LATERAL LUNGE (EACH SIDE)

Runners only move in one plane of motion, forward (& back). It is important for runners to build hip strength and stability by incorporating lateral moves into their workouts to run stronger and help avoid injuries. 

With both toes pointing forward, push your hips back and take a large step to your right and bend your right knee into a side lunge position and straighten your left leg. Lower your hips as low as your flexibility will allow. Push back to starting position. Repeat on other side. 

SINGLE LEG DEADLIFT (EACH SIDE)

When you run you are balancing on one leg at time repeatedly for the duration of your run. If you perform exercises unilaterally (one side at a time) it will help reduce muscle imbalances, improve core strength & stability and increase runner-specific strength. The single leg deadlift is an ideal exercise for runners.

Standing on one leg, keep your knee slightly bent and perform a deadlift by bending at your hip while keeping your back straight and neck neutral. Extend your free leg behind you in line with your body. Lower until your back is parallel to the floor. With your back straight return to the upright position. Repeat on other side. 

PLANK ROWS

Start in a high straight arm plank position with your wrists directly under your shoulders and your legs wider than hip width for stability. Keep your body in a straight line from your shoulders to ankles while engaging your core. Do not allow your hips to hike up or sag down.

With your core tight and your glutes engaged lift your right elbow to row as you bend your elbow up toward the ceiling. Keep your elbows close to your sides as you raise the kettlebell. Repeat on other side. 

Give it a try and let me know what you think!

Like this post? It helps me when you share or save to your favorite Pinterest workout board.

TREADMILL TABATA WORKOUT

Welcome to the latest edition of Workout Wednesday! You may have noticed I am a little obsessed with the Tabata protocol. Tabata is 20 seconds of work, followed by 10 seconds of rest for 8 rounds totaling four minutes. I use them a lot on my Workout Wednesday posts, I use them at my bootcamps (great for group fitness!) and even in my own workouts. 

I must point out that a true Tabata is a near 100% effort for 20 seconds/followed by complete rest for 10 seconds. This is not exactly what we are doing here, so it is more of a play on the Tabata protocol, than an exact Tabata workout. 

If four minutes doesn't seem like enough of a workout for you, try doing burpees (or other intense exercise) during the 20 second work periods and see how you feel after four minutes. Hah. Otherwise, I stack them with a one minute rest period between each four minute Tabata.

This is a treadmill workout using my version of Tabata protocol. You can download a free Tabata timer app for your phone to easily track the intervals or use a (---> affiliate link) GymBoss timer like I do.

I don't like to assign speeds (mph) or paces to workouts published on this blog because everyone is so different. A 6.0 mph speed (10 minute mile pace) on the treadmill may feel like a leisurely jog to one person and be an all-out sprint to another. Always work at your own level. Please don't try to hit some arbitrary pace because a workout on Pinterest told you to. 

This is why I prefer the RPE chart. The RPE chart levels the playing field. Rate of Perceived Exertion allows you to work at the level that is appropriate for your fitness levels based on how you feel and your breathing rate. 

TREADMILL TABATA WORKOUT

MINUTES 1-4

Start by warming up for four steady minutes (no Tabata) at a 2-3 on the RPE chart. This is to get your blood circulating and prepare your body for a more intense workout. 

MINUTES 4-8

We will start to increase the intensity in this four minute Tabata. Choose a speed that will put you at a RPE 4-6. This may be a jog. You should be able to carry on a conversation at this pace. Cycle through the 20 seconds work/10 seconds rest protocol for four minutes. 

*During the rest intervals you can choose to lower the speed on the treadmill to a walking pace but with only 10 seconds to rest it doesn't give you much time for the belt to slow down before you need to speed back up into the work phase. Some people may choose to simply jump to the sides of the treadmill during the 10 second rest phase and let the belt roll. This could be dangerous, we don't want to fall off the back of the treadmill when we hop back on. Try at your own risk. I personally always choose to go with staying on the slowing belt during the rest. Safety first. 

MINUTES 8-9

Active rest at RPE 2-3 for one minute before starting your next cycle. This is usually a walk or very slow jog.

MINUTES 9-13

This cycle we are going to up the intensity a little more to a RPE 7-8 from the above chart. You should be working hard during the 20 second work intervals. 

MINUTES 13-14

Active rest at RPE 2-3 for one minute before starting your next cycle. 

MINUTES 14-18

This is your last high intensity cycle. Work at a RPE 7-8 again during the 20 second work intervals and RPE 2-3 during the 10 second rests. This is your last Tabata. Make it count. 

MINUTES 18-20

Cool down for at least two minutes by walking.

Give it a try! Like this post? Please consider sharing or saving to your favorite Pinterest workout board.