JULY 2016

Running A-Z: I is for Injury Prevention for Runners

It's another week of Running A-Z, where I cover a running-related topic following the order of the alphabet. This week is the letter I. We will be talking about exercises for injury prevention. If you missed any of our past editions, you can catch up with letters A-H in the archives.

If you read this blog on a regular basis you know that I am a huge proponent of strength training for runners. In fact, I run my whole business on the notion that runners who strength train are stronger, faster and less prone to injury. But I get it. Runners generally don't enjoy the strength training aspect as much as they love to run. The good news is that you don't need to spend hours in the gym for basic injury prevention exercises. Runners generally need to work on strengthening their hips and abs. I challenge you as a runner to find 15 minutes three times a week to perform these exercises. Our goal is to strengthen those hip muscles to avoid injury.

You'll want to progress the exercises to make them more difficult over time, either by adding an extra set, a few reps, or adding resistance. Begin with two sets of ten reps for each exercise. After a week add an extra set. Once you are doing three sets, start adding additional reps each week until you're at three sets and 20 reps. Then make the exercises more challenging or add resistance. By continually progressing the exercises you will avoid adaptation and will get stronger over time. 

CLAMSHELLS

Lie on your side with your knees slightly bent with your legs and ankles together. You can prop yourself up on your forearm during the exercise. Open and close your knees like a clam by lifting your top knee up. Repeat on the opposite side.

Progress the exercise by adding a resistance band to your thighs.

BIRD DOG

On all fours with your wrists directly underneath your shoulders lift one arm off the floor to shoulder height while lifting the opposite leg in line with the hip. Switch arms/legs after 30 seconds. Squeeze your abs and glutes during the move while breathing normally.

Progress the exercise by extending the time in position.

HIP ABDUCTION

Lie on your side with your legs stacked on top of one another. Lift your top leg to about 45 degrees before lowering. Switch sides and repeat.

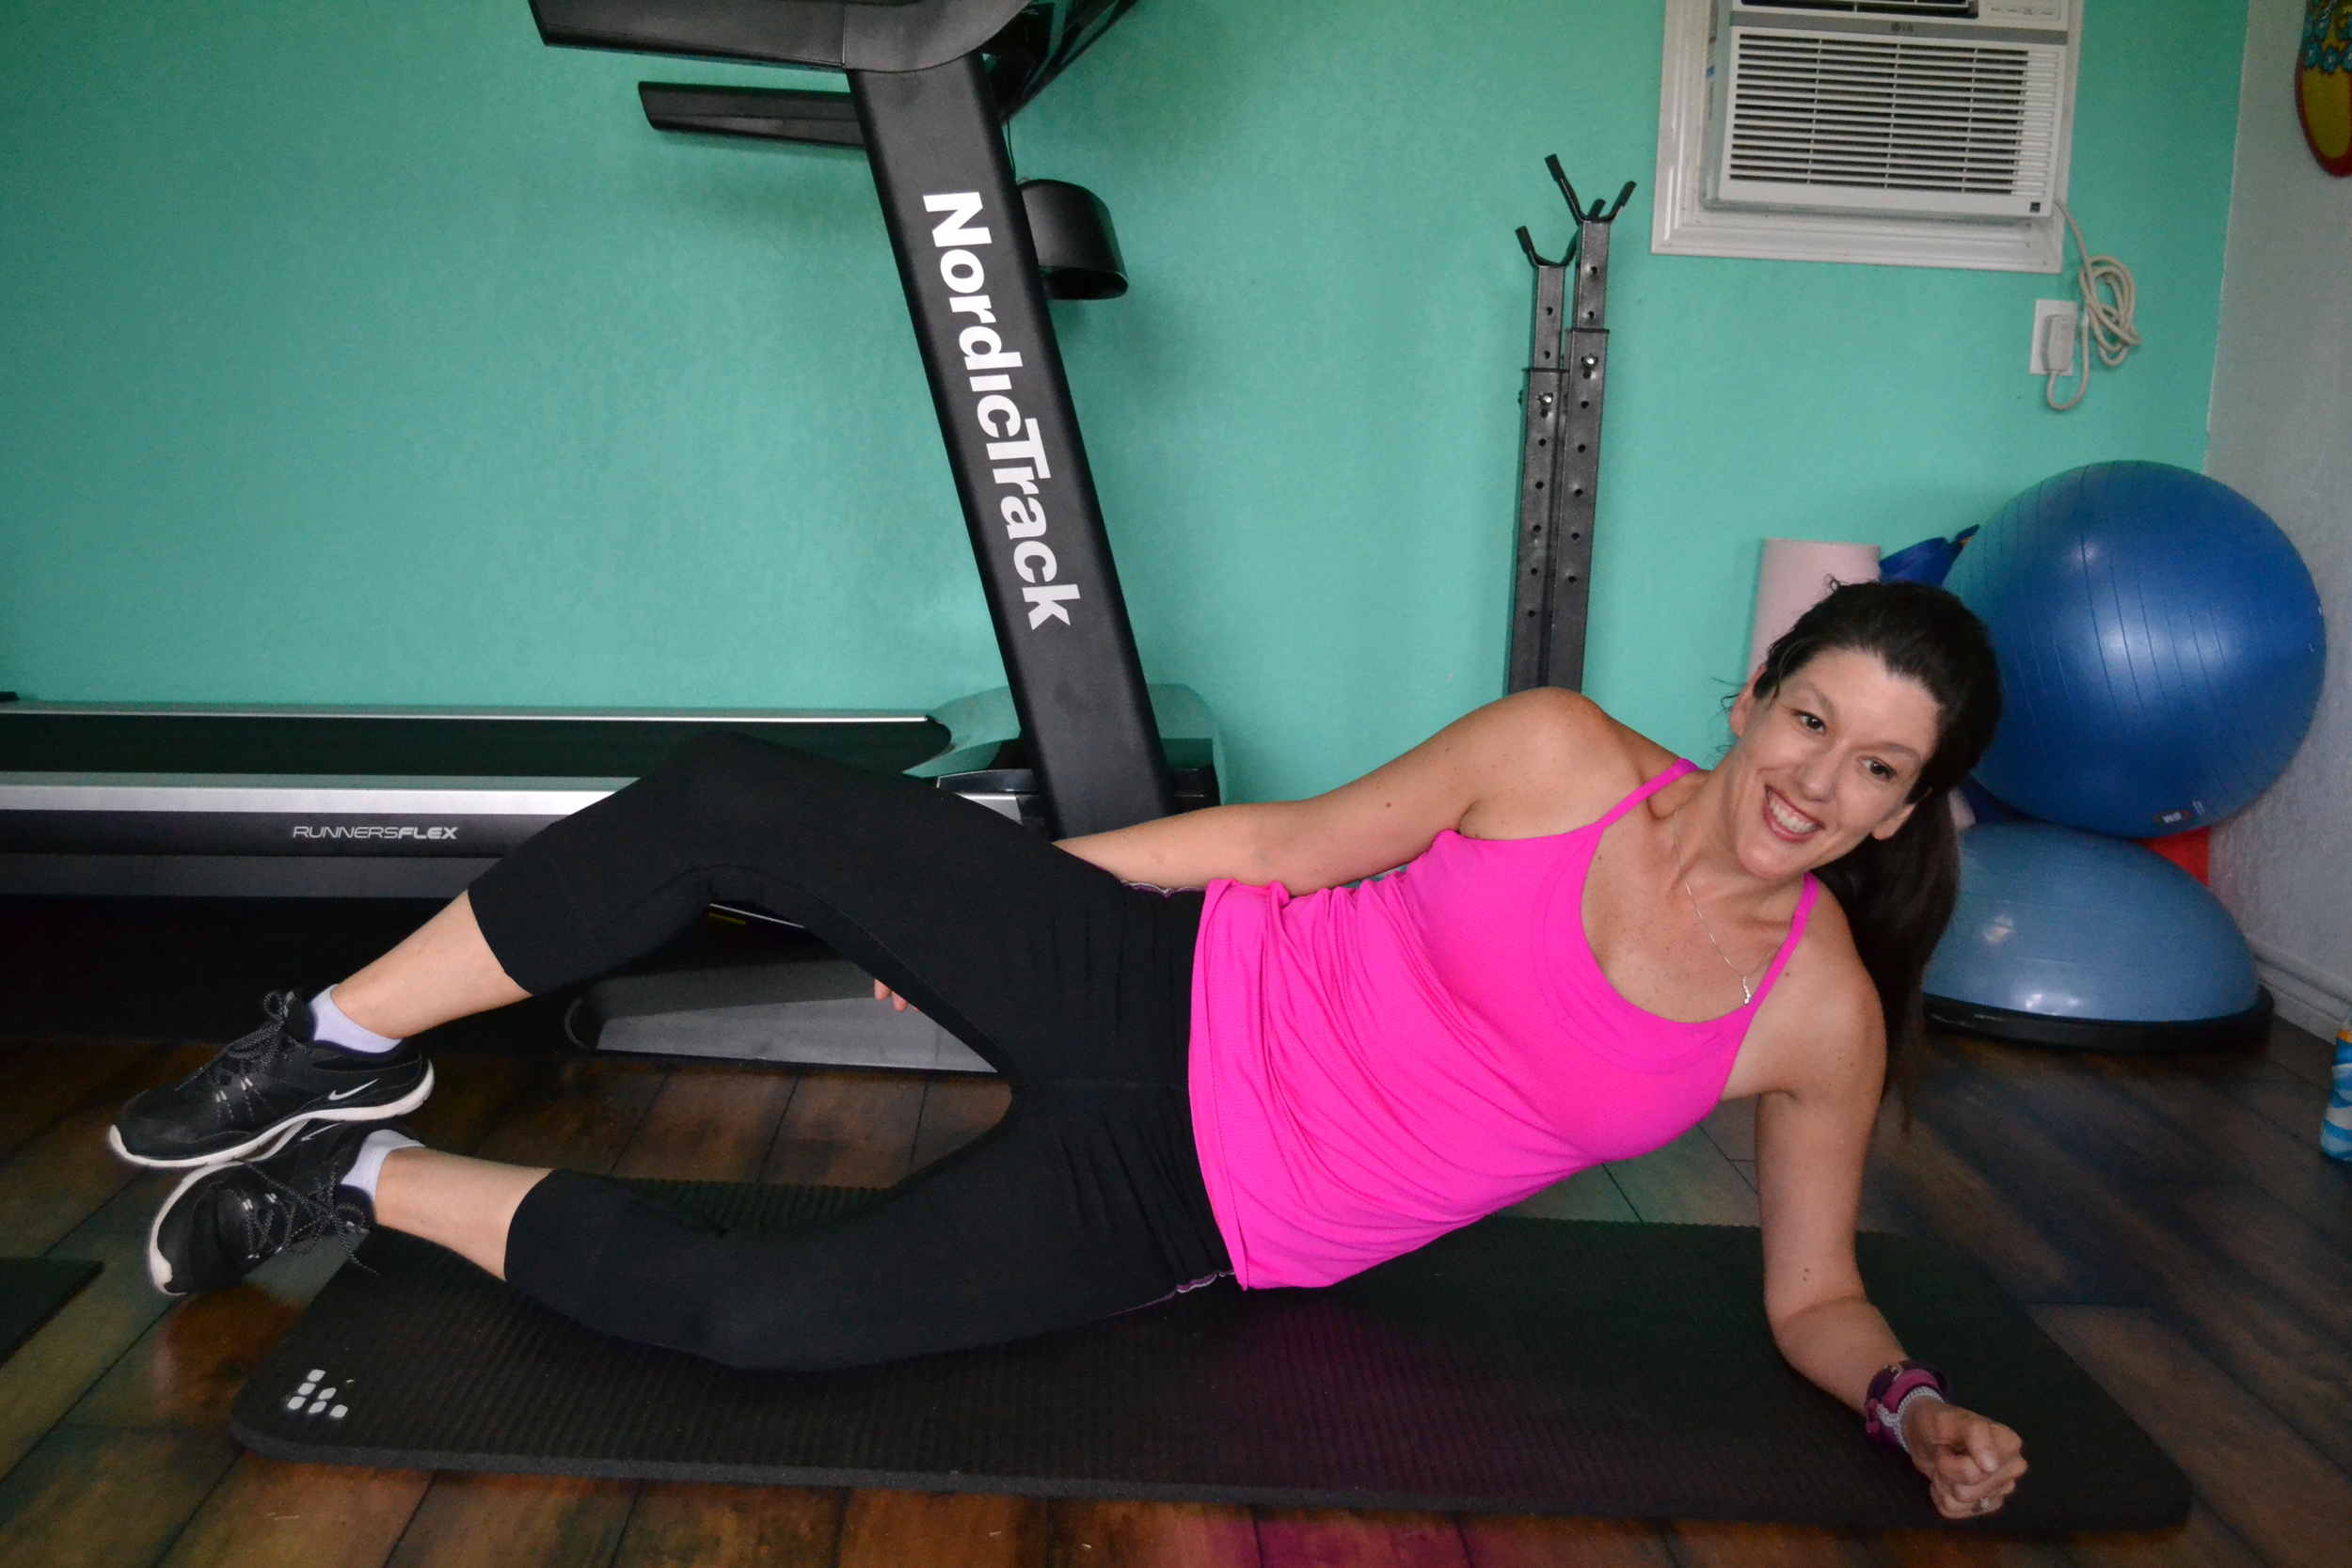
Progress the hip abduction when you're ready by advancing to the side plank hip abduction.

With a straight arm lift yourself up into a side plank position. Your shoulders should be directly over your wrists. Stack your feet and don't allow your hips to drop. Lift your top leg. Switch sides and repeat.

GLUTE BRIDGE

Lie on your back with your knees bent and lift your hips off the floor while engaging your glutes and abs. Your body should be in a straight line from your knees to your shoulders.  Lower your hips to the floor and repeat. 

Progress the exercise my lifting one leg, then alternating the leg. 

I encourage you to work these four exercises into your weekly routine to build hip strength. It is important to remember that while I am a personal trainer and running coach, I am not your personal trainer and running coach. Please get clearance from a medical professional before beginning any new exercise routine.

Any questions? 

Like this post? Please consider sharing.

7 Fitness Mistakes that Can Kill Your Results

You've been working out and eating healthfully but not seeing the results that you expected. What's going on? It can be frustrating when you've been working hard but feeling like it's not getting you closer to achieving your goals. Are you making one of these seven fitness mistakes?

Rushing the Process 

The truth is that fitness progress takes time. Any program that promises results in nine weeks or 90 days is using a marketing ploy to entice you with a quick fix. Yes, you can make progress in that amount of time, but fitness is a life-long commitment, not a three month challenge. 

A lot of people start a new workout program, remain consistent for three or four weeks and then get frustrated and quit when the results aren't there as quickly as they hoped or expected. It took you much longer to get out of shape, so you can't expect to turn everything around in a few short weeks. The good news is that after three weeks you are on the right track to building a fitness habit. It is a great start. The difference between those who fail and those who succeed is that the successful people don't quit.

Consistency is the key. Put in the work. Give it time. Make it a habit. You will get there. 

Focusing on scale weight

The scale doesn't tell the whole story. It is important to remember that when looking to lose weight, you should be focusing solely on fat loss, not weight loss. 

A scale can show weight loss that is mostly water or muscle (bad) instead of fat, but you still may walk away feeling happy that you "lost" three pounds. Losing three pounds of muscle is not good, but the scale can't tell you that.

On the other hand, the scale may not budge a lot when you are losing fat and gaining muscle because muscle is more dense than fat and takes up less space in your body. That is why your clothes may fit looser but your body weight stays the same.

Focus on non-scale victories. How do you feel? How do your clothes fit? How are your energy levels? A scale is one tool to use in your fitness journey, not the end-all-be-all. Don't give it too much power, as it doesn't tell you the whole story.

Skipping Strength Training

It can be easy to fall into a all-cardio-all-the-time routine when on a mission to lose fat. While cardio plays an important role in fat loss and heart health, it shouldn't be the only thing you do to improve your fitness. 

Strength training or resistance training can be the missing link to successful fat loss. It helps you maintain and build lean muscle. You want to make sure you are preserving your muscle mass while you lose weight. The more muscle you have on your body the more calories you burn, even at rest.

Some women don't want to lift weights because they worry about getting too bulky or masculine looking, but this fear is unfounded. The women that look like that work extremely hard to achieve that look over years of dedicated training for that specific goal. Unless you are specifically training and eating to look like a bodybuilder over a long period of time, you won't look like one. I promise.  

You don't need to spend hours in the gym. Carve out 30 minutes three times a week for strength training to build lean muscle for a well-rounded fitness routine.

Eating too much or too little

Nutrition is tricky. Some people think that because they are working hard at the gym that gives them a free pass to eat whatever they want. While I am a big proponent of balance, eating fast food after your daily workouts isn't going to get you the results that you desire. I limit my indulgence meals to once or twice a week. What you do occasionally does not impact what you do consistently. I make healthy choices most of the time so that when I want to eat pizza, sushi or drink wine, I have room for it in my diet. It's an occasional treat, not an everyday occurrence.

On the other end of the spectrum is the problem of eating too little. We know that in order to lose weight we need to create a calorie deficit, which means to eat fewer calories than we burn. Seems simple enough, eat less to lose weight, eat even less to lose more weight, right? Not so fast. Everyone's calories needs are different so I can't put an exact calorie count on it, but when a very active adult woman is not eating and wondering why she is not getting the results she desires, the answer is probably in her calorie intake. You can't thrive on kale and tuna.

Under eating can sabotage your results as much as over eating. Without proper fuel you won't have the energy to give your workout the intensity you need for results. Under eating can damage your metabolism, cause you to lose muscle, kill your results and put you at risk for malnutrition, resulting in unhealthy weight loss and possible nutrient deficiencies.

A person with an unhealthy obsession with healthy eating may be suffering from a disorder called orthorexia nervosa, a term which means fixation on righteous eating. 

The key is to be like Goldilocks, not too much, not too little. If you need help determining what that means for you, I recommend working with a registered Dietitian for professional guidance. 

Working out too much

Sometimes working out is like make up, less is more. When working out becomes an unhealthy obsession it can be harmful. Some people think that doubling or tripling their time in the gym will double or triple their results, but this is simply not true. Spending needless hours in the gym can increase your chance of injury, cause burnout, fatigue, irritability, possibly raise cortisol levels (the stress hormone) to unhealthy levels and hurt your metabolism. Overtraining causes the benefits of exercise to diminish. 

Moderate amounts of exercise of 30-60 minutes most days of the week is best way to go. Remember Goldilocks? 

Not resting

This goes hand in hand with working out too much, but even when exercising a moderate amount of 30-60 minutes a day, we still need our rest and recovery in between workouts. It is during rest that the body adapts to the stress of exercise and rebuilds. If you never rest, you won't see the results because you never give your muscles a chance to repair. Continuous workouts without rest will make you weaker, not stronger. Allow yourself one or two full rest days a week and never work the same muscle groups two days in a row. 

Not getting enough Sleep

If it came down to the choice of one hour of working out or one hour of sleep, how do you think the experts would advise you to spend your time? If you are not getting the 7-9 hours a sleep that your body needs, the answer would be sleep, every single time. Going to bed at midnight and setting your alarm for 5am to workout is not doing your body any favors. 

Not getting enough sleep, less than seven hours of sleep per night, can reduce the benefits of healthy eating and exercise. Lack of sleep can cause you feel unfocused, hungry and, despite efforts in the gym, not achieve results. When you don't get enough sleep, your cortisol (stress hormone) levels can rise, which can be associated with fat gain. 

Aim for 7-9 hours a sleep a night to maximize your efforts with nutrition and in the gym.

Have you ever made any of these fitness mistakes? I can write with confidence about these, because I personally have made most of them myself. Over the last decade on my fitness journey, I have grown by making a lot of mistakes and then learning from them. My aim is to help you not make the same mistakes I did, so you can be healthy, strong and see amazing results from your fitness efforts. 

Like this post? Please consider sharing.


'Round the World Lunges: 4 Minute Lunge Workout

It's workout Wednesday and today we are talking lunge variations. With this 'round the world lunge workout you can hit your lunges from all angles. This workout is a great finisher after a run.

I love the lunge because it works several major muscle groups at once. It targets big muscle groups including the glutes, hamstrings and quadriceps. Your abdominal, back and calf muscles act as stabilizers during this exercise. A lunge is great for challenging balance and stability. Exercises like the lunge that work unilaterally (one leg at a time) are ideal for runners, since while we run we transfer our body weight on one leg at a time. 

This workout is structured Tabata-style, that means that you do 20 seconds of reps followed by 10 seconds of rest for 8 rounds, which equals four minutes. It is a great workout for people (I'm looking at you runners) who do not have a lot of time to get in their strength training. You could go for a run and finish it with this great four minute lunge circuit (or repeat 3 times with a one minute rest between rounds for a total of 15 minutes). Change up the exercises after each run and sneak in a full body workout each week at only four minutes at a time. 

Round the World Lunges

FORWARD LUNGE

With your feet hip width apart and your toes pointed straight ahead, engage your core and keep your back straight. Take one large step with your right leg to lunge forward until your front knee is lined up over your ankle and your back knee is nearly touching the floor. Do not allow your knee to move forward over your toes. Resist the urge to lean forward or rest your arms on your thighs. Once you are in the lunge position push back up to starting position. Repeat for 20 seconds on the right leg, rest for 10 seconds, then repeat on the left leg for 20 seconds. 

SIDE LUNGE

With both toes pointing forward, push your hips back and take a large step to your right and bend your right knee into a side lunge position and straighten your left leg. Do not allow your knees to move forward past your toes. Lower your hips as low as your flexibility will allow. Push back to starting position and repeat on the right side for 20 seconds before resting for 10 seconds, then moving onto the left side. 

BACK LUNGE

With your feet hip width apart and your toes pointing straight ahead, take a large step backward with your right leg, so your right knee almost touches the floor and your left leg lunges at a 90 degree angle. Do not allow your left knee to move forward past your toe. Push back up to starting position. Once in starting position, kick your right leg straight out behind you. Repeat for 20 seconds, rest for 10 seconds, then change sides.

kick your leg straight out behind you once you return to the starting position.

kick your leg straight out behind you once you return to the starting position.


CURTSY LUNGE

Stand with your feet hip apart. Cross your right leg behind the body and to the left. Bend left knee 90 degrees, or as low your flexibility will allow, toes pointing forward, then return to starting position. Repeat for 20 seconds on one side. Rest for 10 seconds before moving on to the other side.

Give it a try and let me know how it goes. Stay tuned for more workouts that you add to the end of your run. 

It is important to remember that while I am a personal trainer, I am not your personal trainer that knows your medical background and exercise abilities. Please consult a medical professional before beginning any new exercise program. 

Like this article? Please consider sharing.

Running A-Z: H is for Heart Rate (Interval Heart Rate Training)

Welcome to the latest edition of Running A-Z, a weekly blog post where I cover a running-related topic following the order of the alphabet. We are on letter H, you can catch up on letters A through G in the archives.

H is for Heart Rate

You bought a shiny new heart rate monitor, a new GPS watch with a HR monitor or a FitBit. You love being able to look at your wrist and seeing your heart rate at any given moment, but what does it mean? Just knowing your heart rate isn't enough, you need to know how to apply that knowledge to maximize your training. 

What are heart rate training zones? What is my max heart rate? What is my resting heart rate? How does this impact my training? I'm going to explain it all!

HR ZONES

HR STAGE % OF HR
STAGE 1 65-75%
STAGE 2 76-85%
STAGE 3 86-95%

We are going to establish your personalized training stages based on your max and resting heart rate using the HR reserve method. HRR is calculated using the Karvonen method formula:

((HRMAX - HR REST) X DESIRED INTENSITY) + HR REST

Having flashbacks of high school algebra? Don't worry, there are a ton of online calculators that will make this extremely easy. But before we start you need to know your resting heart rate and your max (or estimated) max heart rate. 

Estimating Max Heart Rate:

There is a formula that is widely used to calculate max heart rate but you should be aware that is an estimate and will probably need to be adjusted once you start your heart rate training. You may find when you start training that your heart rate will go higher than your calculated max rate, there is no need to worry, your heart is probably not exploding. You just need to adjust your calculations with your actual max heart rate. Don't worry if it doesn't make sense yet. Just keep reading.

To start take 220-your age to get an estimated max heart rate. 

I am 41, so using this formula (220-41) my max heart rate as 179. 

Determining your resting heart rate

A normal resting heart rate for adults is between 60-90 beats per minute. You should take your resting heart rate in the morning before you get out of bed (before your coffee!). Do it for a few days in row to get an idea of your average and make note of the lowest reading. FitBit shows your resting heart rate on the app. Generally speaking, a lower resting heart rate implies a healthier more efficient heart. 

According to my FitBit my resting heart rate is 55 BPM. 

Putting it all together with the Karvonen method formula

So now we have the numbers, let use the Karvonen method formula (or an online calculator) to calculate our target heart rates. 

((HRMAX - HR REST) X DESIRED INTENSITY) + HR REST

220-41 (AGE) = 179

179 - 55 (RESTING HEART RATE) = 124

124 X .65 (DESIRED INTENSITY - BASE TRAINING ZONE 65%) = 81 

81 + 55 (RESTING HEART RATE) = 136

136 is the low end of my target heart rate for my base training zone. Here are my heart rate zones based on my age, resting HR, and estimated max heart rate. 

HR STAGE HEART RATE
STAGE 1 136-148
STAGE 2 149-160
STAGE 3 161-173

How to apply HR stages to your training

Heart rate training

Heart rate training

Once you start plugging the numbers it will all makes sense. Trust me, because I am terrible at math and if I can do it, so can you. Let's get to the fun part, the training!

STAGE ONE

Stage 1 is your base training zone. This stage should be used for apparently healthy people that are new to exercise, people with a significant amount of weight to lose and for everyone in recovery periods or easy training days. (Yes, you should have easy training days built into your schedule.)

In stage one you should be working at conversational pace, which means you could hold a conversation for the entire duration of the workout without stopping between words or sentences to catch your breath.

People that are new to exercise should gradually build up to 30-60 continuous minutes in this stage before advancing to stage 2. Note you may start at just five minutes if you are new to exercise. The key is to progress slowly and gradually according to your own fitness levels. 

This stage is also sometimes referred to as the fat burning zone, but be careful not to fall for the myth of the fat burning zone. I wrote about it in detail in another post.

STAGE TWO

Stage two is the introduction of interval training. Interval training can be highly effective for fat loss, but be sure you have safely graduated out of stage one before moving to stage two to avoid injury, overtraining or burnout. 

During a Stage Two workout you would begin by warming up in zone one for 5-10 minutes. 

Increase your pace to bring your heart rate into zone 2 for one minute.

Return to zone one for 1-3 minutes or until your heart rate recovers. You will find as your heart gets more efficient over time, you will recover more quickly. 

Repeat the intervals into zone two for one minute and back into recovery for 3-5 times as long your heart recovers within those 3 minutes. It is important that your heart recovers back to stage one before attempting another interval. 

Cool down for 5-10 minutes in stage one. 

This is what a Stage two training day might look like for someone just starting in stage training. This is based on my personal heart rate zones, you will need to calculate your own to get your personalized stages. Need help?

HR STAGE HEART RATE MINUTES
STAGE 1 136-148 5-10
STAGE 2 149-160 1
STAGE 1 136-148 1-3
STAGE 2 149-160 1
STAGE 1 136-148 1-3
STAGE 2 149-160 1
STAGE 1 136-148 5-10

Alternate between stage one and stage two training days so that you never do interval training days back to back. Recovery it key to progress.

STAGE THREE

Stage three is for people with moderately high cardiorespiratory fitness level base. You should have been working in stage two for at least 3-6 weeks. Your heart rate recovery time in stage two should be about a minute between intervals before moving into stage three work. 

Warm up in zone one for 5-10 minutes

Increase the workload (pace or incline) every minute until reaching HR stage three. This should take about two minutes.

Once you reach stage three, stay there for one minute.

Reduce the effort to return to stage two. Once heart rate recovers at this stage (1-3 minutes) push back up into stage 3 for one minute.

Cycle between stage two and stage three before cooling down for 5-10 minutes in stage one. This is what a training day might look like for someone starting out in stage three training.

HR STAGE HEART RATE MINUTES
STAGE 1 136-148 5-10
STAGE 2 149-160 2
STAGE 3 161-173 1
STAGE 2 149-160 1-3
STAGE 3 161-173 1
STAGE 2 149-160 1-3
STAGE 3 161-173 1
STAGE 2 136-148 1-3
STAGE 1 136-148 5-10

Stage two and stage three workouts should not be performed on consecutive days. Effort sessions should be limited to 3 or 4 days a week. Always follow an effort session with an easy day to allow your body the proper time to recover. This helps avoids injury, burnout and overtraining. Remember that adaptation happens during rest, so those rest days are just as important as the workout days. 

It is important to remember that while I am a personal trainer and a running coach, I am not your personal trainer and running coach. Please get clearance from a medical professional before beginning any new workout regiment, especially one like this that taxes the heart. 

If you live in the Fort Worth area and need help setting up your heart rate zones, please visit my personal training services pages, I'd love to work with you!

Do you have a heart rate monitor? Do you train using heart rate zones or stages? Any questions? I'd love to hear how it is going for you.

Like this post? Please consider sharing.


Don't Make This Mistake on The Treadmill: The Myth of the Fat Burning Zone

Knowing your max heart rate, monitoring your heart rate during exercise and working in heart rate zones can be a great way to gauge intensity during your workouts. When you are trying to lose fat, it can be a little confusing to determine the correct heart rate zone to meet your goals. There is a lot of misinformation circulating and treadmill manufacturers add to this confusion.

We've all seen the chart on the treadmill at the gym. It says something like this:

Fat Burning Zone 60-70% of max heart rate

Cardio zone 70-80%  of max heart rate

Anaerobic zone 80-90% of max heart rate

Max 90-100% of max heart rate

It sounds great and easy. Want to lose fat? Work in the low intensity fat burning zone to burn more fat, right? Not so fast.

When you workout your body uses mostly fat or carbs (glycogen stores) as the energy source. While working at 70% of your max heart rate it's true that the overall percentage of fat utilized is higher in this low intensity heart rate zone. However you will burn a higher number of calories while working at a higher intensity.

What matters is the total amount of calories you burn, not the percentage that comes from fat. If you exercise at a lower intensity, a higher percentage of energy may come from fat, but this still will be a smaller number of overall calories.

If you increase your workout intensity, you will burn more total calories and therefore more fat calories.

Here's an example: At 60% max HR your calorie burn will be approx. 66% fat and 34% carbs. If you walk for 20 minutes at 60% max HR you may burn 100 total calories (rounded for easy math) and that would equal 66 fat calories. If you increase your workout intensity to 80% of your max HR, in the same 20 minutes you may burn 200 total calories, but the percentage that comes from fat drops to only 50%.

Max heart rate          Total Calories          %Fat         Fat Calories

60%                            100                         66%           66

80%                            200                        50%           100

You burned 100 fat calories at 80% max HR which is more than the 66 fat calories you burned at 70% max HR. You can see that at the higher intensity you burned a smaller percentage of fat, but still a larger amount of fat calories and overall calories. 

In the end it’s not about what type of fuel you burn while you workout, it’s about overall calorie expenditure to lose fat. 

The best method to lose fat is to increase your intensity to burn more overall calories. You can burn enough calories for fat loss at a lower intensity, you just need to do it for a much longer duration. A more efficient way to lose fat is to increase intensity. 

If you are unable to maintain a higher intensity workout, it is best to do low intensity while you build your fitness base. It's important to note that the low intensity heart rate zone has its place. 

Besides being great for active recovery in between hard workouts, It is the perfect heart rate zone for people new to exercising, returning after an extended break or people with significant amount of weight to lose to safely build a cardio base. Once you can safely maintain 30-45 minutes of low intensity work 3-4 times a week, you will likely be ready to graduate to higher intensity exercise.

It is a mistake to work on the treadmill at a lower intensity than your fitness level allows because you believe that this is going to burn more fat. Get that heart rate up to see incredible results!

Are you confused by the heart rate zones and how to calculate your own max heart rate? Check out this blog post to clear it all up for you in my Running A-Z series: H is for heart rate. 
 

Like this post? Please consider sharing.